Complete PAM Backdoor Malware Analysis - A Detailed Walkthrough

Let me take you on a complete journey through this malware analysis, explaining not just what I did, but why I did it at each step, what I was thinking, and how each discovery led to the next. This is the story of how we unravel a sophisticated piece of malware, told in a way that helps you understand the investigative process itself.
Challenge Details

Scenario
A financial institution detected unusual SSH access patterns across multiple servers. Legitimate users were logging in at odd hours, yet security logs showed no anomalies. An incident responder discovered a modified PAM module on one of the compromised servers. Your task: Analyze this malicious PAM module to understand how attackers maintained persistent access and exfiltrated credentials. Uncover all backdoor capabilities and document the threat actor’s techniques.
Initial Reconnaissance
When I first receive a suspicious file, my mind immediately starts asking questions. What kind of file is this? What is it supposed to do? Where would it run? These questions guide my initial investigation.
First thing I did was check what type of file we’re dealing with:
1
file pam-backdoor
So we got an ELF 64-bit LSB shared object - this is a PAM module. PAM modules are libraries that handle authentication on Linux systems, so this is positioned perfectly to steal credentials.
The String Encryption Mystery
Now I know what kind of malware this is - a PAM backdoor. My next question is: what does it actually do? The obvious first step would be to run the strings command to see what text is embedded in the binary. Malware often contains file paths it accesses, commands it runs, URLs it contacts, or error messages that reveal its purpose.
But when I run strings on this binary, I notice something suspicious. I see lots of normal library function names like strcmp, fopen, malloc - all the standard C library functions you would expect. But I do not see any suspicious file paths, no obvious backdoor passwords, no command strings, nothing that screams “I am malware!” This is a huge red flag.
Think about what a PAM backdoor needs to function. It needs to know what password to accept as a backdoor, where to log captured credentials, what commands to run, and where to find additional malicious scripts. All of this configuration data should be somewhere in the binary. If I cannot see it in the strings output, there is only one explanation: the strings are encrypted.
This is where my investigation takes a turn. I am no longer looking for what the malware does, I am looking for how it hides what it does. The decryption routine becomes my primary target because once I find it, I can unlock all those hidden secrets.
Hunting for the Decryption Function - Disassembly Begins
To find encrypted strings, I need to find the function that decrypts them. I start by disassembling the entire binary:
1
objdump -M intel -d pam-backdoor > disassembly.txt
The objdump command is a powerful tool for examining binary files. The -d flag tells it to disassemble (convert machine code back to assembly language), and -M intel specifies that I want Intel syntax rather than AT&T syntax (Intel syntax is more readable to me). I redirect the output to a file because it will be thousands of lines long.
Now I need to search through this disassembly looking for patterns that suggest string decryption. Let me search for XOR operations, since XOR is commonly used in simple encryption:
1
grep -n "xor.*BYTE PTR" disassembly.txt | head -20
The -n flag adds line numbers to the output, which helps me locate interesting sections. I am specifically looking for XOR operations that work with byte pointers, because string encryption typically works byte by byte. I see many results, but I need to narrow it down further. Let me look for XOR operations that appear to be in a loop structure:
1
grep -B5 -A5 "xor.*dl,BYTE PTR" disassembly.txt | less
The -B5 shows five lines before each match, and -A5 shows five lines after, giving me context. As I scroll through the results using less, I am looking for a pattern where:
- There is a counter being incremented
- The XOR operation is inside what looks like a loop
- The result is being stored somewhere
After examining several candidates, I find something very interesting around address 0x32a0. Let me extract just that section:
1
objdump -M intel -d challenge | sed -n '/32a0:/,/32f0:/p'
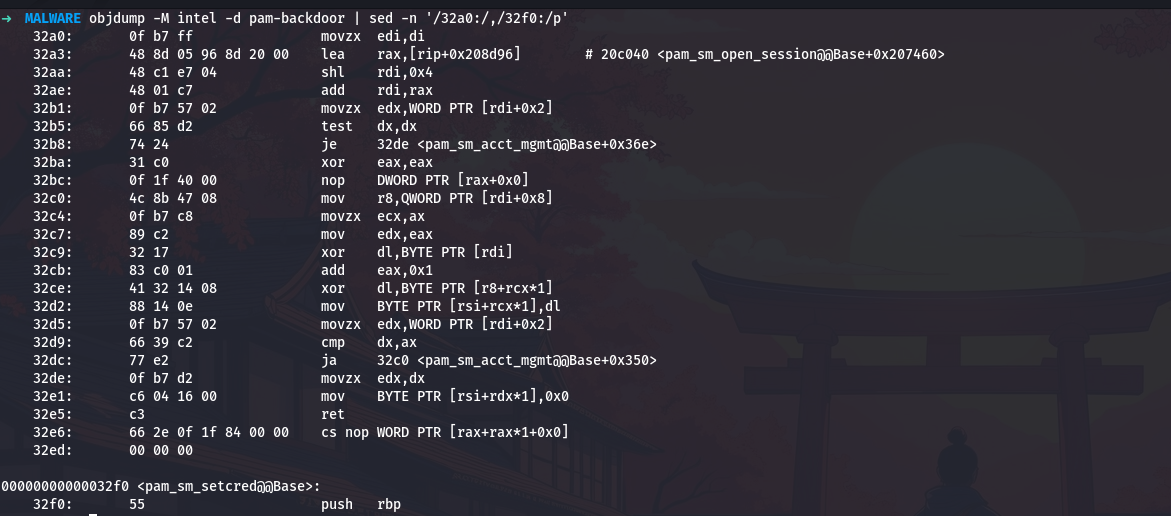
This command uses sed to extract lines between address 32a0 and 32f0, giving me a focused view of this one function. The output shows:
This is exactly what I am looking for. Let me walk through what this code does, instruction by instruction, because understanding this function is the key to unlocking all the malware’s secrets.
Dissecting the Decryption Function - Deep Analysis
The function starts with movzx edi,di, which zero-extends a sixteen-bit value in di to fill the full sixty-four-bit rdi register. This tells me the function takes a small integer as its first parameter, likely a string index number. The zero-extension ensures there are no garbage bits that could cause problems with later calculations.
Next comes lea rax,[rip+0x208d96]. The lea instruction calculates an address but does not actually load data from that address. The notation [rip+0x208d96] means “take the current instruction pointer, add this large offset, and that is the address we want.” Let me calculate where this actually points:
I add seven to account for the length of the instruction itself (the rip value used is the address of the next instruction). The result is 0x20c040, which is our encrypted string table base address.
Then I see shl rdi,0x4. Shifting left by four bits is the same as multiplying by sixteen. This is a classic optimization, shift operations are faster than multiplication on most processors. So the code is calculating index * 16. Why sixteen? Because each entry in the string table is sixteen bytes long.
The instruction add rdi,rax then adds the table base address to this offset, giving us the address of the specific table entry for our requested string index.
Now the function starts accessing fields within this sixteen-byte entry. The instruction movzx edx,WORD PTR [rdi+0x2] loads a two-byte value from offset two in the entry. The movzx (move with zero extension) instruction means this is an unsigned value. This is the string length.
Then test dx,dx checks if this length is zero, and je 32de jumps to the end if so. This is a safety check - if there is no string data, just return immediately.
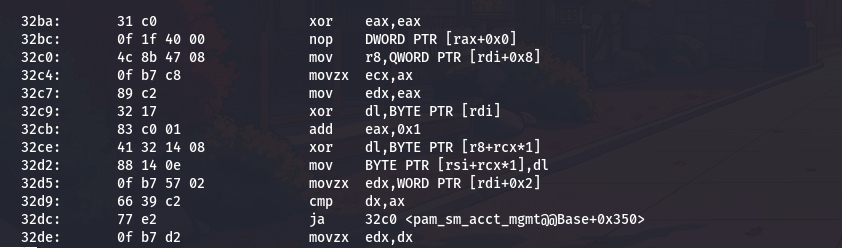
The real decryption happens in the loop that starts at 0x32c0. Let me trace through one iteration:
First, mov r8,QWORD PTR [rdi+0x8] loads an eight-byte pointer from offset eight in the entry. This pointer tells us where the encrypted string data actually lives in memory.
Then movzx ecx,ax and mov edx,eax copy the loop counter (which started at zero and gets incremented each time through). The counter serves as both the position in the string and part of the key stream.
Here comes the critical cryptographic operation: xor dl,BYTE PTR [rdi]. This XORs the counter with a byte at offset zero in the table entry. This is our encryption key. Then xor dl,BYTE PTR [r8+rcx*1] XORs that result with the actual encrypted byte from the encrypted data. The final result gets stored with mov BYTE PTR [rsi+rcx*1],dl, writing the decrypted byte to the output buffer.
So the complete decryption algorithm is:
1
decrypted_byte = (key XOR position) XOR encrypted_byte
The loop continues with add eax,0x1 incrementing the counter, and cmp dx,ax followed by ja 32c0 checking if we have processed all bytes yet.
Finally, after the loop completes, mov BYTE PTR [rsi+rdx*1],0x0 adds a null terminator to make this a proper C string.
Now I understand the complete table structure:
- Offset 0: One-byte XOR key
- Offset 2: Two-byte string length
- Offset 8: Eight-byte pointer to encrypted data
Extracting the Encrypted String Table
Now that I understand the structure, I need to see the actual data. I know the table is at address 0x20c040, but that is a virtual memory address. I need to convert this to a file offset. Let me check the ELF section headers:
1
readelf -S pam-backdoor | grep -E "Name|20c"
The readelf command reads ELF file headers and structures. The -S flag shows section headers. I am searching for the section that contains address 0x20c (the first part of 0x20c040). The output shows:
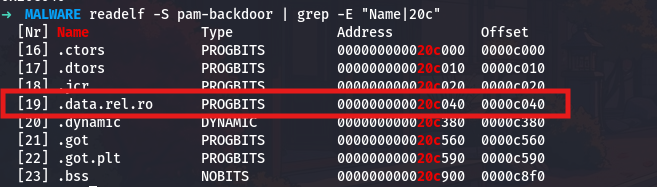
The section .data.rel.ro (data that is read-only after relocation) starts at virtual address 0x20c040, and it is located at file offset 0xc040. Now I can dump the raw bytes:
1
od -A x -t x1z -N 256 -j 0xc040 pam-backdoor
The od command (octal dump, though I am using hex) displays file contents in various formats. The flags I use are:
-A x: Show addresses in hexadecimal-t x1: Display each byte as a two-digit hexadecimal number-N 256: Show only 256 bytes (enough for several entries)-j 0xc040: Skip to offset 0xc040 (our table location)z: Also show ASCII interpretation on the right
The output is:
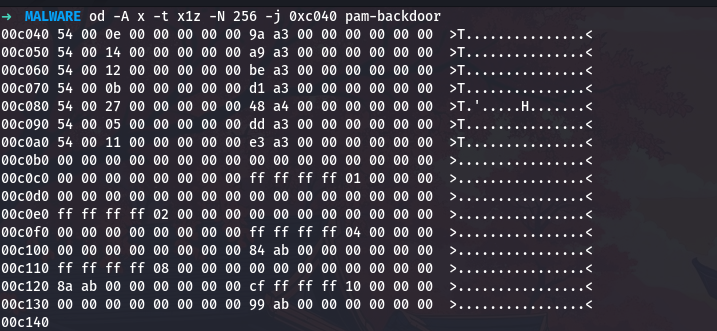
Every entry starts with 0x54 at offset zero, that is our XOR key. Let me verify my understanding of the structure by examining entry zero in detail:
- Bytes 0-0:
0x54(the XOR key) - Bytes 1-1:
0x00(padding) - Bytes 2-3:
0x0e0x00(length = 14 in little-endian) - Bytes 4-7:
0x000x000x000x00(more padding) - Bytes 8-15:
0x9a0xa30x000x000x000x000x000x00(pointer =0xa39ain little-endian)
I can count seven valid entries (each starting with 0x54) before hitting the block of all zeros at 0xc0b0, which marks the end of the table.
Decrypting the First String - The Backdoor Password
With the decryption algorithm understood, I can now decrypt the strings. I start with string zero because in malware, the most important configuration usually comes first.
String zero has:
- Key:
0x54 - Length:
0x0e(14 bytes) - Encrypted data at address:
0xa39a
My encrypted data at 0xa39a is therefore at file offset 0xa39a. Let me extract the first encrypted byte:
1
od -A x -t x1 -N 1 -j 0xa39a pam-backdoor

The first encrypted byte is 0x6d. Now I can manually decrypt the first character to verify my algorithm understanding:
1
2
3
4
5
6
key = 0x54
position = 0
encrypted_byte = 0x6d

decrypted = (key ^ position) ^ encrypted_byte
print(f"Position {position}: encrypted=0x{encrypted_byte:02x}, decrypted=0x{decrypted:02x} ('{chr(decrypted)}')")
Output:
1
Position 0: encrypted=0x6d, decrypted=0x39 ('9')
The first character decrypts to 9. Now let me write a complete script to decrypt the entire string:
1
2
3
4
5
6
7
8
9
10
11
12
13
14
15
16
17
18
19
20
21
22
23
24
import subprocess

key = 0x54
offset = 0xa39a
length = 0x0e


result = subprocess.run(
    f"od -A n -t x1 -N {length} -j 0x{offset:x} pam-backdoor",
    shell=True,
    capture_output=True,
    text=True
)


encrypted_hex = result.stdout.strip().replace('\n', ' ')
encrypted_bytes = bytes.fromhex(encrypted_hex)

decrypted = ""
for position, encrypted_byte in enumerate(encrypted_bytes):
    decrypted_byte = ((key ^ position) ^ encrypted_byte)
    decrypted += chr(decrypted_byte)

print(f"Entry 0 decrypted: {decrypted}")

This is our backdoor password! It looks exactly like what you would expect, a strong random password with uppercase, lowercase, digits, and special characters. With this single password, an attacker can access any account on the system.
Decrypting All Seven Strings - Building the Complete Picture
Now let me decrypt all seven entries to see the complete configuration. First, let me create a more comprehensive script:
1
2
3
4
5
6
7
8
9
10
11
12
13
14
15
16
17
18
19
20
21
22
23
24
25
26
27
28
29
30
31
32
33
34
35
36
37
38
39
40
41
42
43
44
45
46
47
48
49
50
import subprocess
import struct


def read_entry(entry_num):
    offset = 0xc040 + (entry_num * 16)
    result = subprocess.run(
        f"od -A n -t x1 -N 16 -j 0x{offset:x} pam-backdoor",
        shell=True,
        capture_output=True,
        text=True
    )

    bytes_hex = result.stdout.strip().replace('\n', ' ')
    entry_bytes = bytes.fromhex(bytes_hex)


    xor_key = entry_bytes[0]
    length = struct.unpack('<H', entry_bytes[2:4])[0]  #
    pointer = struct.unpack('<Q', entry_bytes[8:16])[0]

    return xor_key, length, pointer


def decrypt_string(key, offset, length):
    if length == 0:
        return ""

    result = subprocess.run(
        f"od -A n -t x1 -N {length} -j 0x{offset:x} pam-backdoor",
        shell=True,
        capture_output=True,
        text=True
    )

    encrypted_hex = result.stdout.strip().replace('\n', ' ')
    encrypted_bytes = bytes.fromhex(encrypted_hex)

    decrypted = ""
    for position, encrypted_byte in enumerate(encrypted_bytes):
        decrypted_byte = ((key ^ position) ^ encrypted_byte)
        decrypted += chr(decrypted_byte)

    return decrypted

for i in range(7):
    key, length, pointer = read_entry(i)
    if length > 0:
        decrypted_string = decrypt_string(key, pointer, length)
        print(f"Entry {i}: {decrypted_string}")
Running this script gives me all seven decrypted strings:
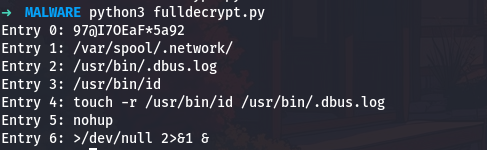
Now the malware’s capabilities become entry clear:
- Entry 0 is the backdoor password
- Entry 1 is a hidden directory for malicious scripts
- Entry 2 is where captured credentials are logged
- Entry 3 is a legitimate system file used for timestamp reference
- Entry 4 is a complete command for timestamp manipulation
- Entry 5 is a utility for running persistent processes
- Entry 6 is shell syntax for silent background execution
Timestamp Manipulation - Making Old What is New
The most elegant anti-forensics technique in this malware is the timestamp manipulation. Let me show you exactly how this works and why it is so devastating to forensic investigations.
First, let me extract and show you the exact command the malware uses:
1
touch -r /usr/bin/id /usr/bin/.dbus.log
Now let me explain why this is absolutely brilliant from an anti-forensics perspective. When a forensics investigator analyzes a compromised system, one of the first things they look for is recently modified files. The reasoning is simple - if the system was compromised yesterday, any malicious files were probably created or modified around that time. Investigators routinely use commands like this:
1
2
find /usr -type f -mtime -7
find /usr -type f -newermt "2024-12-01"
These searches rely entirely on file timestamps. Every file in a Unix system has three important timestamps that you can see with the stat command:
1
stat /usr/bin/id
This shows you the access time (atime), modification time (mtime), and change time (ctime). These timestamps tell investigators when a file was last accessed, when its content was last modified, and when its metadata (like permissions) was last changed.
Now here is where the malware’s technique becomes devastating. The touch -r command copies all the timestamps from one file to another. Let me show you how this works in practice:
1
2
3
4
5
# See the timestamps of a legitimate system file
stat /usr/bin/id

# This file has been on the system since installation
# Its timestamps might show dates from years ago
When the malware runs touch -r /usr/bin/id /usr/bin/.dbus.log, it copies those ancient timestamps from the legitimate system binary to its malicious log file. So if an investigator checks the log file:
1
stat /usr/bin/.dbus.log
The timestamps would show dates from years ago, making it appear that this file has been part of the system since installation. The investigator would likely skip right past it when looking for recently created malicious files. This is like a burglar breaking into your house today but making it look like they have been living there for years.
The choice of /usr/bin/id as the reference file is also clever. This is a core system utility that exists on every Unix system and has never been updated since the operating system was installed. Using it as a timestamp reference ensures the malware’s log file will always appear to be as old as the operating system itself.
Finding the Password Comparison Function
Now I need to find where the backdoor password is actually used in the authentication logic. Let me search for calls to string comparison functions:
1
objdump -M intel -d pam-backdoor | grep "call.*strcmp" -B10 | less
The -B10 flag shows ten lines before each strcmp call, giving me context about what strings are being compared. As I scroll through the results, I find a very interesting section:
1
objdump -M intel -d pam-backdoor | sed -n '/36fa:/,/3710:/p'
This extracts the code around address 0x36fa:
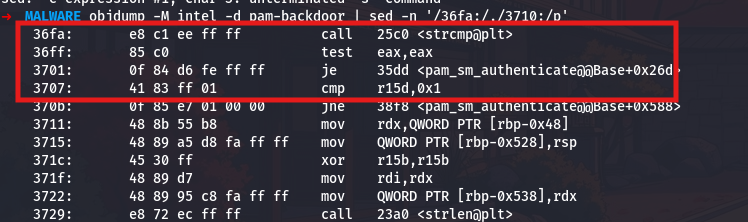
The strcmp call at 0x36fa compares two strings and returns zero if they match. The immediately following test eax,eax checks if the return value is zero, and the je 35dd (jump if equal) branches to the success path when the passwords match.
Let me trace back to see what strings are being compared. I will look at the code leading up to this comparison:
1
objdump -M intel -d pam-backdoor | sed -n '/36e5:/,/36fa:/p'

The two strings being compared are loaded into rdi and rsi before the strcmp call. The first parameter (rdi) comes from [rbp-0x510], which is a local variable that holds the decrypted backdoor password. The second parameter (rsi) comes from r14, which holds the user-supplied password. The comparison is straightforward - if they match, access is granted.
Discovering Username Retrieval
Before comparing passwords, the malware needs to know which account is being accessed. Let me search for PAM API calls:
1
objdump -M intel -d pam-backdoor | grep "call.*pam_" | head -20
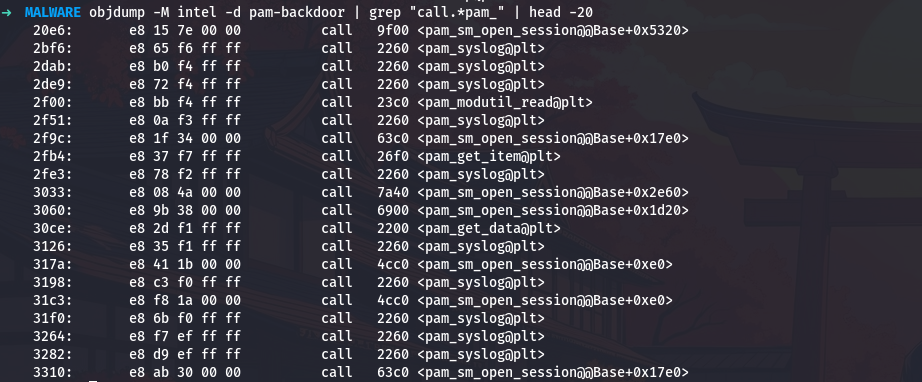
This shows me various PAM function calls. I am specifically interested in pam_get_user:
1
objdump -M intel -d pam-backdoor | grep "call.*pam_get_user" -B5 -A10

At address 0x3468, the malware calls pam_get_user to retrieve the username. The PAM handle is passed in rdi (the first parameter), and the function returns zero on success. The code checks the return value with test eax,eax and jumps to error handling if it is non-zero.
This is exactly how a legitimate PAM module would retrieve the username, making the malware’s behavior similar from normal operation.
Finding the File Access Check
Now I need to understand exactly how the malware manages the credential log file. This gets interesting because the malware needs to handle two different scenarios: creating a new log file when none exists, and updating an existing log file when it already contains data. Each scenario requires a different file opening mode, and the malware author has optimized the code by packing multiple mode strings together in memory.Let me start by finding where the malware checks if the log file exists:
Let me start by finding where the malware checks if the log file exists:
1
objdump -M intel -d pam-backdoor | grep "call.*access" -B10 -A5
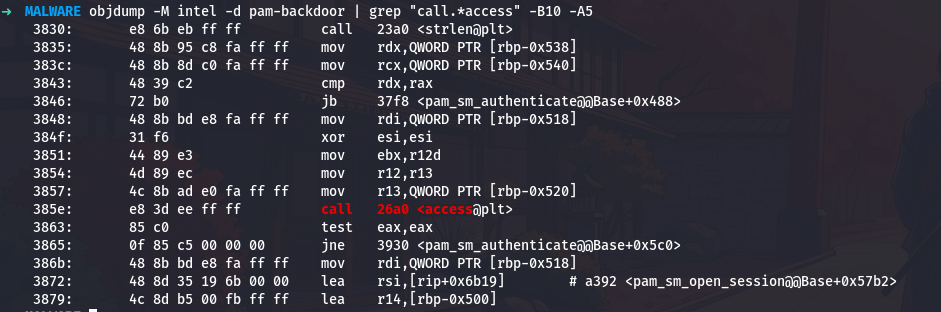
At address 0x385e, the malware calls the access function. This function is part of the standard C library and checks whether a file exists and whether the process has permission to access it. The first parameter in rdi contains the file path /usr/bin/.dbus.log that we decrypted earlier. The second parameter in esi is zero, which corresponds to the constant F_OK in Unix programming. This constant means “just check if the file exists at all, regardless of permissions.”
The access function returns zero if the file exists and is accessible, or it returns negative one if the file does not exist or cannot be accessed. The code immediately tests this return value with test eax,eax and then uses a conditional jump jne 3930 which means “jump if not equal to zero.” So if the file does not exist, execution jumps to address 0x3930. If the file does exist, execution continues with the next instruction.
This creates two distinct code paths that I need to analyze separately.
When the file does not exist, the code jumps to address 0x3930. Let me examine what happens there:
1
objdump -M intel -d pam-backdoor | sed -n '/3930:/,/3950:/p'
1
2
3
4
3930:       48 8b bd e8 fa ff ff    mov    rdi,QWORD PTR [rbp-0x518]
    3937:       48 8d 35 5a 6a 00 00    lea    rsi,[rip+0x6a5a]
    393e:       4c 8d b5 00 fb ff ff    lea    r14,[rbp-0x500]
    3945:       e8 66 e9 ff ff          call   22b0 <fopen@plt>
At address 0x3930, the code loads the file path again into rdi. This will be the first parameter to fopen. Then at address 0x3937, something very important happens. The instruction lea rsi,[rip+0x6a5a] loads the address of a string into rsi, which will be the second parameter to fopen. This second parameter is the mode string that tells fopen how to open the file.
Now I need to calculate exactly where this mode string is located. The rip register contains the address of the next instruction after the current one, so I need to add the offset 0x6a5a to the address of the instruction that comes after this lea instruction. Let me do the calculation:
1
python3 -c "print(hex(0x3937 + 0x6a5a + 7))"
The seven accounts for the length of the lea instruction itself. The result is 0xa398. Now let me see what string is stored at that address:
1
od -A x -t c -N 5 -j 0xa398 pam-backdoor

So the mode string is “a” followed by a null terminator. The additional characters after the null terminator are actually the beginning of other strings that happen to be stored nearby in memory.
Finding the Hex Encoding Function
I know the malware hex-encodes credentials before logging them. Let me find the code that does this encoding:
1
objdump -M intel -d pam-backdoor | grep "sprintf" -B5 -A5 | less
As I examine the sprintf calls, I find one that is clearly in a loop, suggesting it processes each character:
1
objdump -M intel -d pam-backdoor | sed -n '/3790:/,/37b0:/p'

The format string is loaded at 0x3797 from address rip+0x6bf0. Let me calculate where that points:
1
python3 -c "print(hex(0x3797 + 0x6bf0 + 7))"
This gives 0xa38e. Now let me see what format string is there:
1
od -A x -t c -N 10 -j 0xa38e pam-backdoor

The format string is %2X, which formats each byte as two uppercase hexadecimal digits. So the character A (ASCII 0x41) becomes 41.
Understanding the Complete Log Format
Now I need to find the format for the complete log entry. Let me search for where the final log line is constructed:
1
objdump -M intel -d pam-backdoor | sed -n '/3968:/,/3980:/p'

I need to find what format string is being used. Let me look a bit earlier:
1
objdump -M intel -d pam-backdoor | sed -n '/395e:/,/3972:/p'
1
2
3
4
5
395e:       48 8d 35 c3 6a 00 00    lea    rsi,[rip+0x6ac3]
    3965:       f3 48 ab                rep stos QWORD PTR es:[rdi],rax
    3968:       48 8b 8d f0 fa ff ff    mov    rcx,QWORD PTR [rbp-0x510]
    396f:       4c 89 f7                mov    rdi,r14
    3972:       e8 99 ea ff ff          call   2410 <sprintf@plt>
The format string is at rip+0x6ac3 from address 0x395e. Let me calculate:
1
python3 -c "print(hex(0x395e + 0x6ac3 + 7))"
This gives 0xa428. Let me see what is there:
1
od -A x -t c -N 40 -j 0xa428 pam-backdoor

The format string is:
1
error ServiceUnknown->%s : %s\n
This is clever disguise, the log entries look like error messages from a system service. The two %s placeholders get filled with the hex-encoded username and password.
Analyzing the Script Execution Directory
Now let me investigate how the malware executes scripts from the hidden directory. I know from the decrypted strings that it uses /var/spool/.network/. Let me find where this directory is opened:
1
objdump -M intel -d pam-backdoor | grep "call.*opendir" -B10 -A5
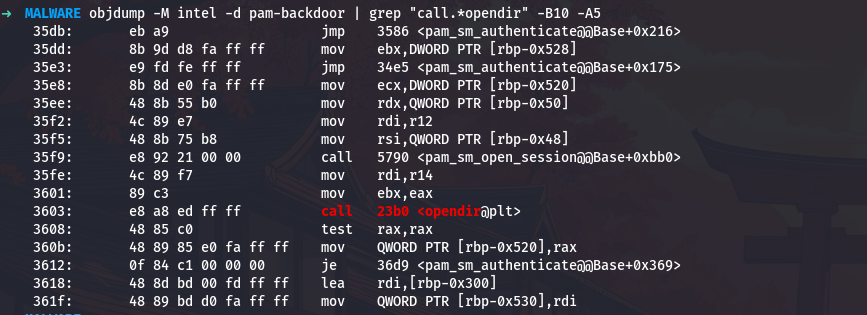
The opendir call at 0x3603 takes the directory path from r14. The return value (a directory handle) is checked for NULL with test rax,rax, and if it is NULL (directory could not be opened), the code jumps to error handling.
Now let me find the loop that reads directory entries:
1
objdump -M intel -d pam-backdoor | grep "call.*readdir" -B5 -A10
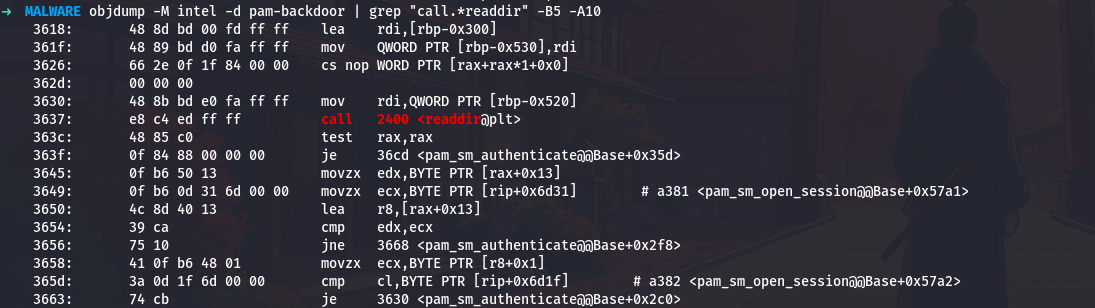
The readdir call at 0x3637 reads the next directory entry. The return value is checked with test rax,rax, and if it is NULL (no more entries), the loop exits by jumping to 0x36cd.
Understanding File Type Filtering
The malware only processes regular files, not directories or other special files. Let me find the file type check:
1
objdump -M intel -d pam-backdoor | sed -n '/3690:/,/36a0:/p'

At address 0x3690, the code compares the byte at offset 0x12 in the dirent structure (which readdir returns in rax) against the value 0x8. In the Linux dirent structure, offset 0x12 is the d_type field, which indicates the file type. The value 0x8 is the constant DT_REG, which represents a regular file.
Let me verify this value:
1
python3 -c "print(f'0x8 in decimal is {0x8}')"
So the malware only processes files where d_type == 8.
Analyzing Command Construction
Now I need to see how the malware builds the command to execute each script. Let me find the sprintf call that constructs the command:
1
objdump -M intel -d pam-backdoor | sed -n '/36a8:/,/36c0:/p'

The format string is loaded from rip+0x6cd4 at address 0x36a8. Let me calculate:
1
python3 -c "print(hex(0x36a8 + 0x6cd4 + 7))"
This gives 0xa383. Let me see what format string is there:
1
od -A x -t c -N 20 -j 0xa383 pam-backdoor

So the format is %s %s%s %s, which takes four string arguments. From the decrypted strings, these are:
- “nohup”
- “/var/spool/.network/”
- The filename from
readdir - ”>/dev/null 2>&1 &”
The constructed command would look like:
1
nohup /var/spool/.network/script.sh >/dev/null 2>&1 &
Finding the System Call
Right after the sprintf that constructs the command, I see a call to system:
1
objdump -M intel -d pam-backdoor | sed -n '/36bc:/,/36d0:/p'

The system call at 0x36c3 executes the command string that was just constructed in the buffer at [rbp-0x530]. After execution, the code jumps back to 0x3630 to process the next file in the directory.
Discovering the Privilege Check
The malware only logs credentials when running as root. Let me find where it checks the effective user ID:
1
objdump -M intel -d pam-backdoor | grep "call.*geteuid" -B5 -A10

At address 0x36d9, the malware calls geteuid to get the effective user ID. The return value is compared against 1 with cmp eax,0x1 at 0x36e2. On Unix systems, user ID 0 is root. If the UID is less than one (meaning it equals zero), the process is running as root.
Let me verify what value indicates root:
1
grep "^root:" /etc/passwd | cut -d: -f3

The output confirms that root has UID 0.
Understanding Buffer Sizes
I need to understand what buffer sizes the malware uses. Let me find where buffers are allocated on the stack:
1
objdump -M intel -d pam-backdoor | sed -n '/3618:/,/3630:/p'

The command buffer is at [rbp-0x300]. Let me find the next buffer allocation:
1
objdump -M intel -d pam-backdoor | sed -n '/3879:/,/3890:/p'
1
3879:       4c 8d b5 00 fb ff ff    lea    r14,[rbp-0x500]
Another buffer is at [rbp-0x500]. The size of the first buffer is the difference:
1
python3 -c "print(f'Buffer size: 0x500 - 0x300 = 0x{0x500 - 0x300:x} = {0x500 - 0x300} bytes')"
1
Buffer size: 0x500 - 0x300 = 0x200 = 512 bytes
Now let me verify this by finding the fgets call that uses this buffer:
1
objdump -M intel -d pam-backdoor | grep -A2 "mov.*esi,0x200"

The fgets call uses 0x200 (512 bytes) as the buffer size.
Finding the Authentication Delay
Security-conscious PAM modules implement delays after failed authentication. Let me search for the pam_fail_delay call:
1
objdump -M intel -d pam-backdoor | grep "call.*pam_fail_delay" -B5 -A2

The delay value is 0x1e8480 in hexadecimal. Let me convert this to decimal and to seconds:
1
2
3
delay_us = 0x1e8480
delay_s = delay_us / 1000000
print(f"Delay: 0x{delay_us:x} = {delay_us} microseconds = {delay_s} seconds")
The output shows:
1
Delay: 0x1e8480 = 2000000 microseconds = 2.0 seconds
So the malware implements a 2s delay after failed authentication attempts.
Identifying PAM Data Storage
PAM modules store state using the pam_set_data function. Let me find how the malware uses this:
1
objdump -M intel -d pam-backdoor | grep "call.*pam_set_data" -B10 | head -30

The identifier string is loaded from rip+0x6af3 at address 0x34d3. Let me calculate:
1
python3 -c "print(hex(0x34d3 + 0x6af3 + 7))"
This gives 0x9fcd. Let me see what string is there:
1
od -A x -t c -N 25 -j 0x9fcd pam-backdoor

So the identifier is unix_setcred_return, which follows conventional PAM naming patterns.
Finding the Password Token Identifier
PAM uses authtok identifiers to store and retrieve passwords. Let me search for where the password is requested:
1
objdump -M intel -d pam-backdoor | sed -n '/3548:/,/3570:/p'

The authtok name is loaded from rip+0x6e22 at address 0x354c. Let me calculate:
1
python3 -c "print(hex(0x354c + 0x6e22 + 7))"
This gives 0xa375. Let me see what string is there:
1
od -A x -t c -N 15 -j 0xa375 pam-backdoor

So the authtok identifier is -UN*X-PASS, which is based on conventional PAM token naming.
Counting All PAM Module Functions
A complete PAM module should implement all the standard interface functions. Let me list all the exported PAM functions:
1
nm -D pam-backdoor | grep "pam_sm_" | awk '{print $3}' | sort

So the malware implements all 6 standard PAM module functions, making it appear as a complete, legitimate PAM module.
Conclusion: Understanding the Complete Picture
Through this detailed analysis with full command-line examples, we have completely reverse-engineered a sophisticated PAM backdoor. We started with a stripped binary and, through systematic investigation using tools like objdump, od, readelf, nm, and custom Python scripts, we discovered:
- Seven encrypted configuration strings protected by simple XOR encryption
- A backdoor password that grants access to any account
- A credential logging mechanism that captures failed login attempts
- A script execution engine that runs malicious code from a hidden directory
- Multiple anti-forensics techniques including timestamp manipulation and file hiding
- Proper PAM module implementation that makes the malware appear legitimate
Every step of this analysis involved running specific commands to extract information, examining assembly code to understand behavior, and using Python to automate decryption and data extraction. The command-line approach gave us complete control over the analysis and allowed us to verify every finding with concrete evidence from the binary itself.
This is how real malware analysis is performed - not with automated tools that give you a report, but with careful manual investigation, reading assembly code, understanding file formats, and using command-line utilities to extract and analyze data. Each command we ran taught us something new about how this malware works, building up a complete picture of its capabilities and techniques.
A special thanks to malops.io for building such a realistic scenario. This challenge was an excellent exercise in malware analysis and reverse engineering.