Master Boot Record (MBR) Analysis

The Master Boot Record (MBR) is a critical structure in a storage device that occupies the first 512 bytes of space on the disk’s very first sector. It serves as the starting point for the boot process and contains key information about how partitions are organized on the disk. In forensic investigations, analyzing the MBR can reveal evidence of manipulation, bootkits, or malware infections. This article will walk you through the basics of MBR analysis using a hexadecimal editor.
Alright, so we know that the Master Boot Record (MBR) starts right at the first sector of the disk. Easy enough, right? But the real question is—how do we figure out where the MBR actually ends? Well, it’s pretty simple. Each pair of hexadecimal digits represents 1 byte, and since the MBR is exactly 512 bytes, once you hit those first 512 bytes, you’re at the end of the MBR.
In the hex editor we’re using, there are 16 bytes per row. That means the first 32 rows of data make up the entire MBR. Another dead giveaway is the MBR signature at the end, which is always represented by 55 AA. If you spot those digits, you’ve found the end of the MBR.
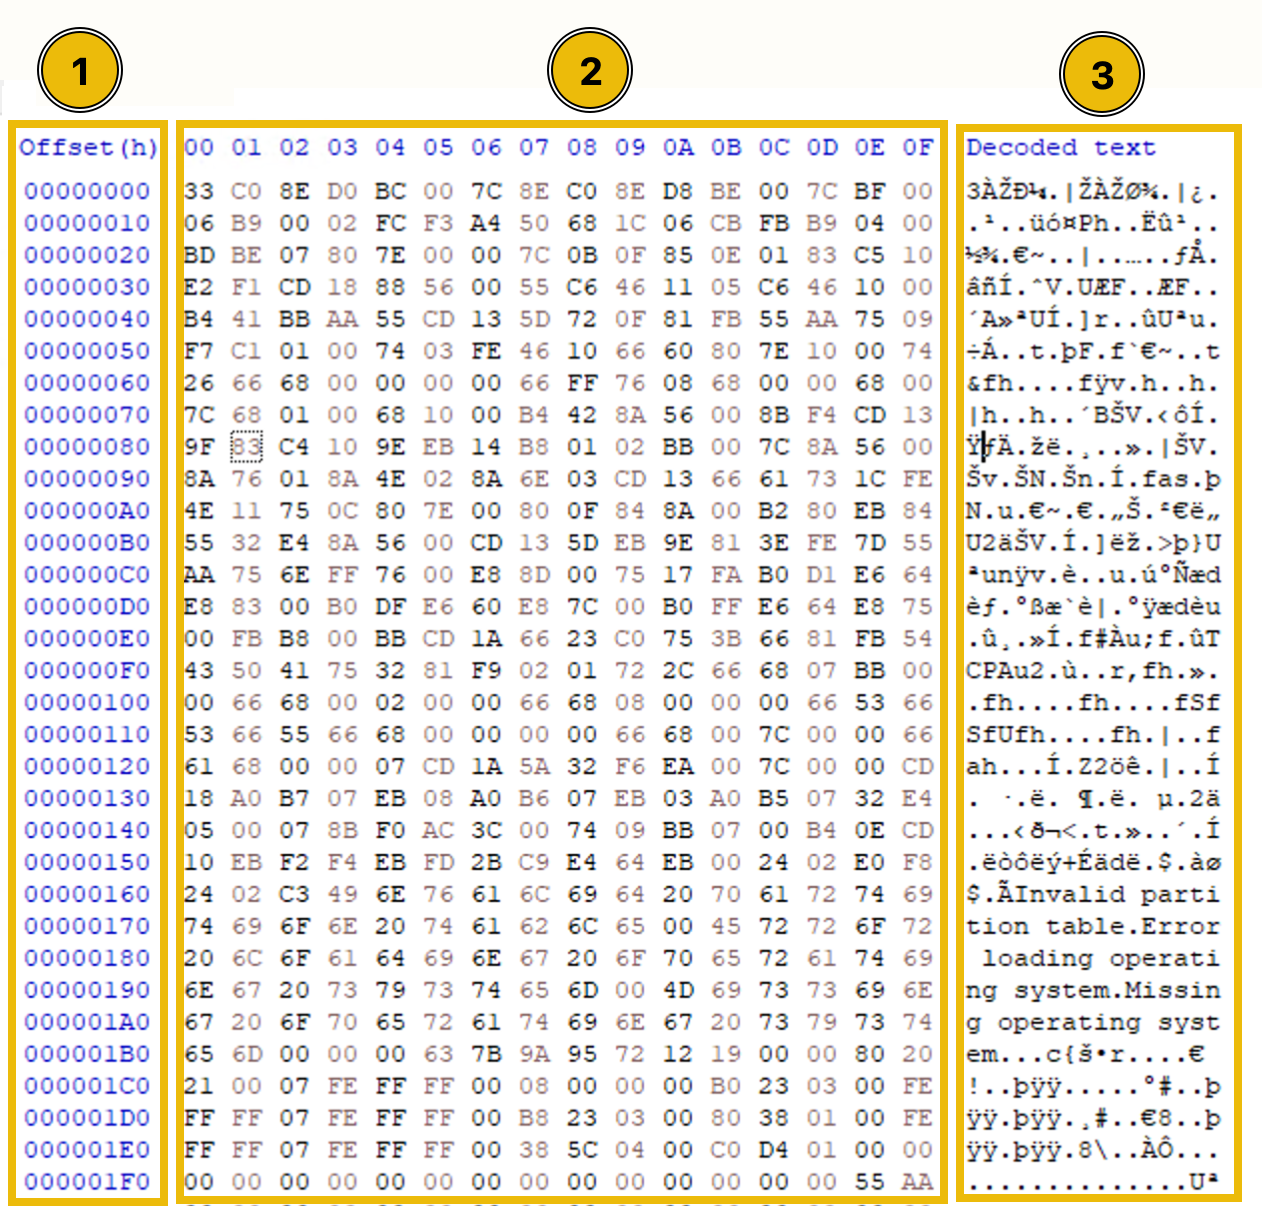
Now, in the screenshot below, you’ll see the MBR section of the disk (the first 512 bytes) opened in a hex editor. Notice that it’s split into three parts:
- Bytes Offset—This tells you where you are in the file.
- Hexadecimal Bytes—This is the raw data we’ll be analyzing.
- ASCII-converted Text—Some of the hex data gets converted into readable text here.
For our task, we’ll focus on the hexadecimal bytes, decoding them to understand what they mean. Don’t worry—it’s easier than it sounds once you get the hang of it!
Before we dive into analyzing the bytes, let’s get one thing clear—every two hexadecimal digits represent one byte. Simple enough, right? So, when we talk about the 512 bytes that make up the MBR, they’re actually divided into three distinct portions.
In the screenshot below, you’ll see how each portion of the MBR is highlighted in different colors to make it easier to understand. Breaking it down like this helps us focus on what each section does and what to look for during the analysis.
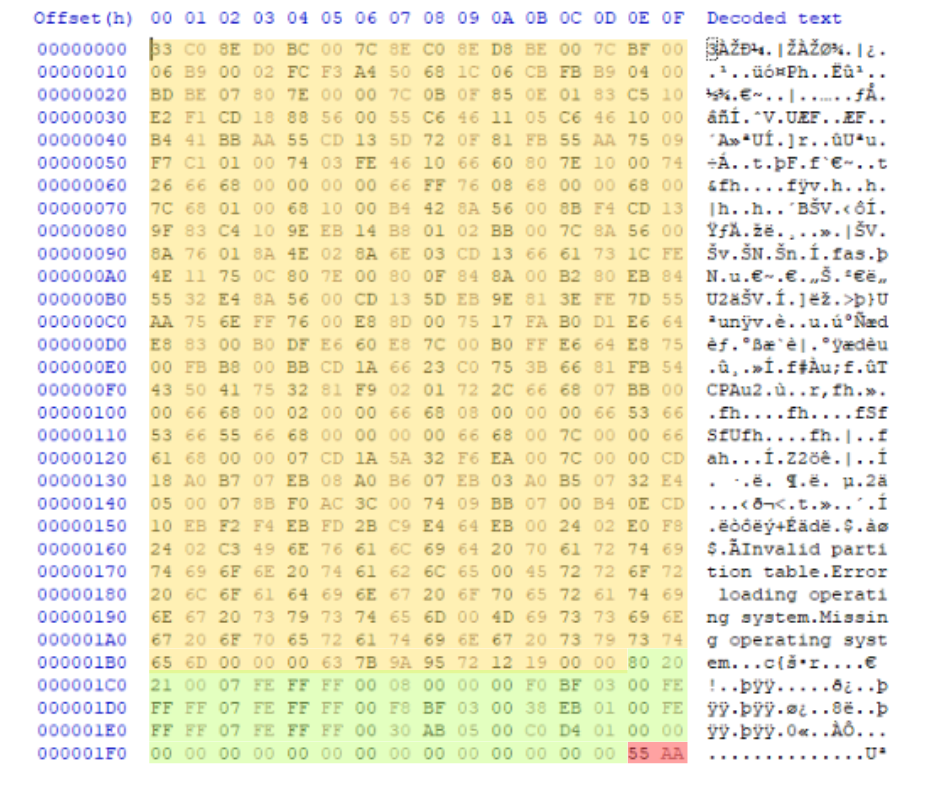
The MBR is divided into three main sections,
Let’s dissect each of the three portions of the MBR.
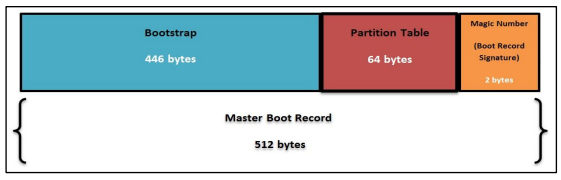
Bootloader Code (Bytes 0-446)
The first part of the Master Boot Record (MBR) is the Bootloader code. This section takes up 446 bytes out of the total 512 bytes—pretty much the bulk of the MBR. Its job? To kick off the boot process by finding and loading the operating system.
You can see the Bootloader code in the screenshot below,
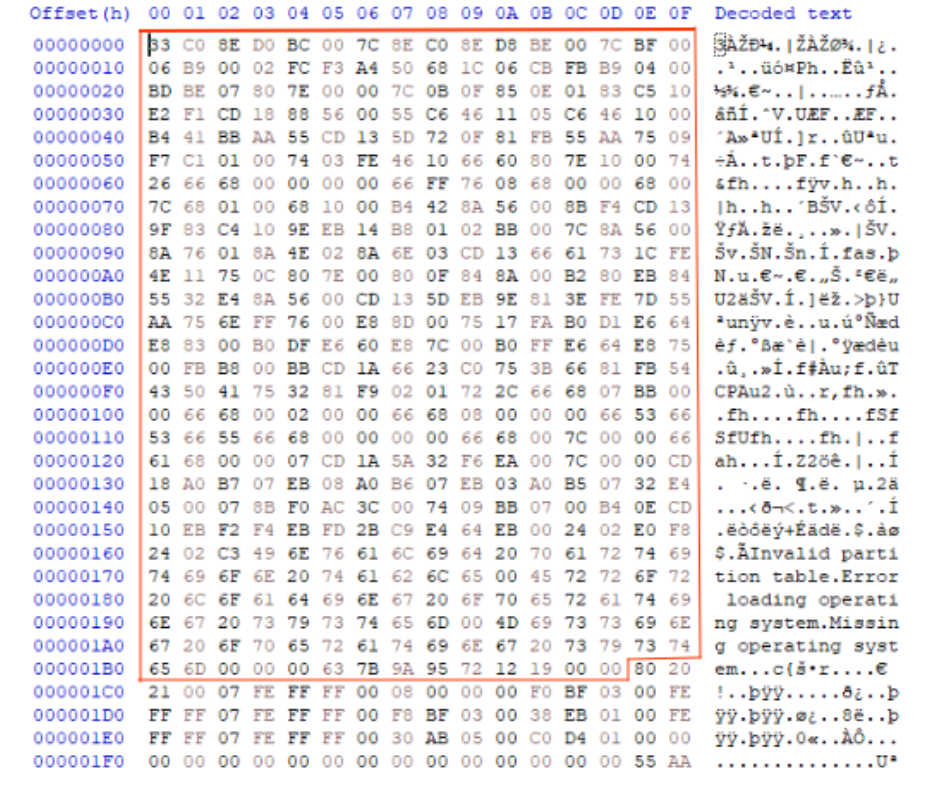
This Bootloader code contains something called the Initial Bootloader. It’s the first thing that runs when the MBR is executed. Its main job? Find the bootable partition by checking the partition table in the MBR. Once it finds the right partition, it passes control to the operating system’s bootloader so your system can start up smoothly.
Quick Note: If you really want to get into the nitty-gritty of how the initial bootloader works, you can disassemble it into assembly language. But don’t worry—that’s beyond the scope of what we’re doing here. For now, we’ll stick to analyzing it at a high level.
Partitions Table (Bytes 446-509)
The second part of the MBR is the partition table, which takes up 64 bytes (from byte 446 to 509). This little table is super important because it holds all the details about the partitions on the disk. One of these partitions is special—it’s called the bootable partition, and it contains all the operating system files needed to start up your system.
Remember the initial bootloader from earlier? Its job is to read this partition table, find the bootable partition, and load the second bootloader from it. The second bootloader then takes over and loads the operating system’s kernel to get things running.
Now, here’s the cool part for forensic analysts: the partition table can reveal a ton of valuable information. It not only helps during the boot process but can also show signs of hidden partitions, tampering, or other suspicious activity.
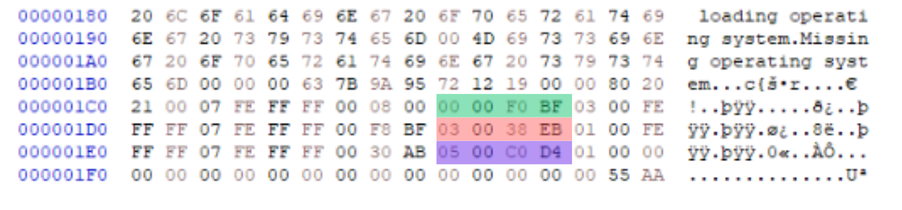
An MBR disk can have up to 4 partitions, and each partition is represented by 16 bytes in the table. In the screenshot below, you’ll see that each partition is highlighted with a different color, making it easy to tell them apart.
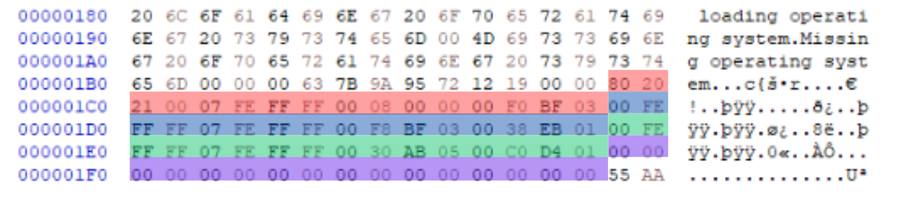
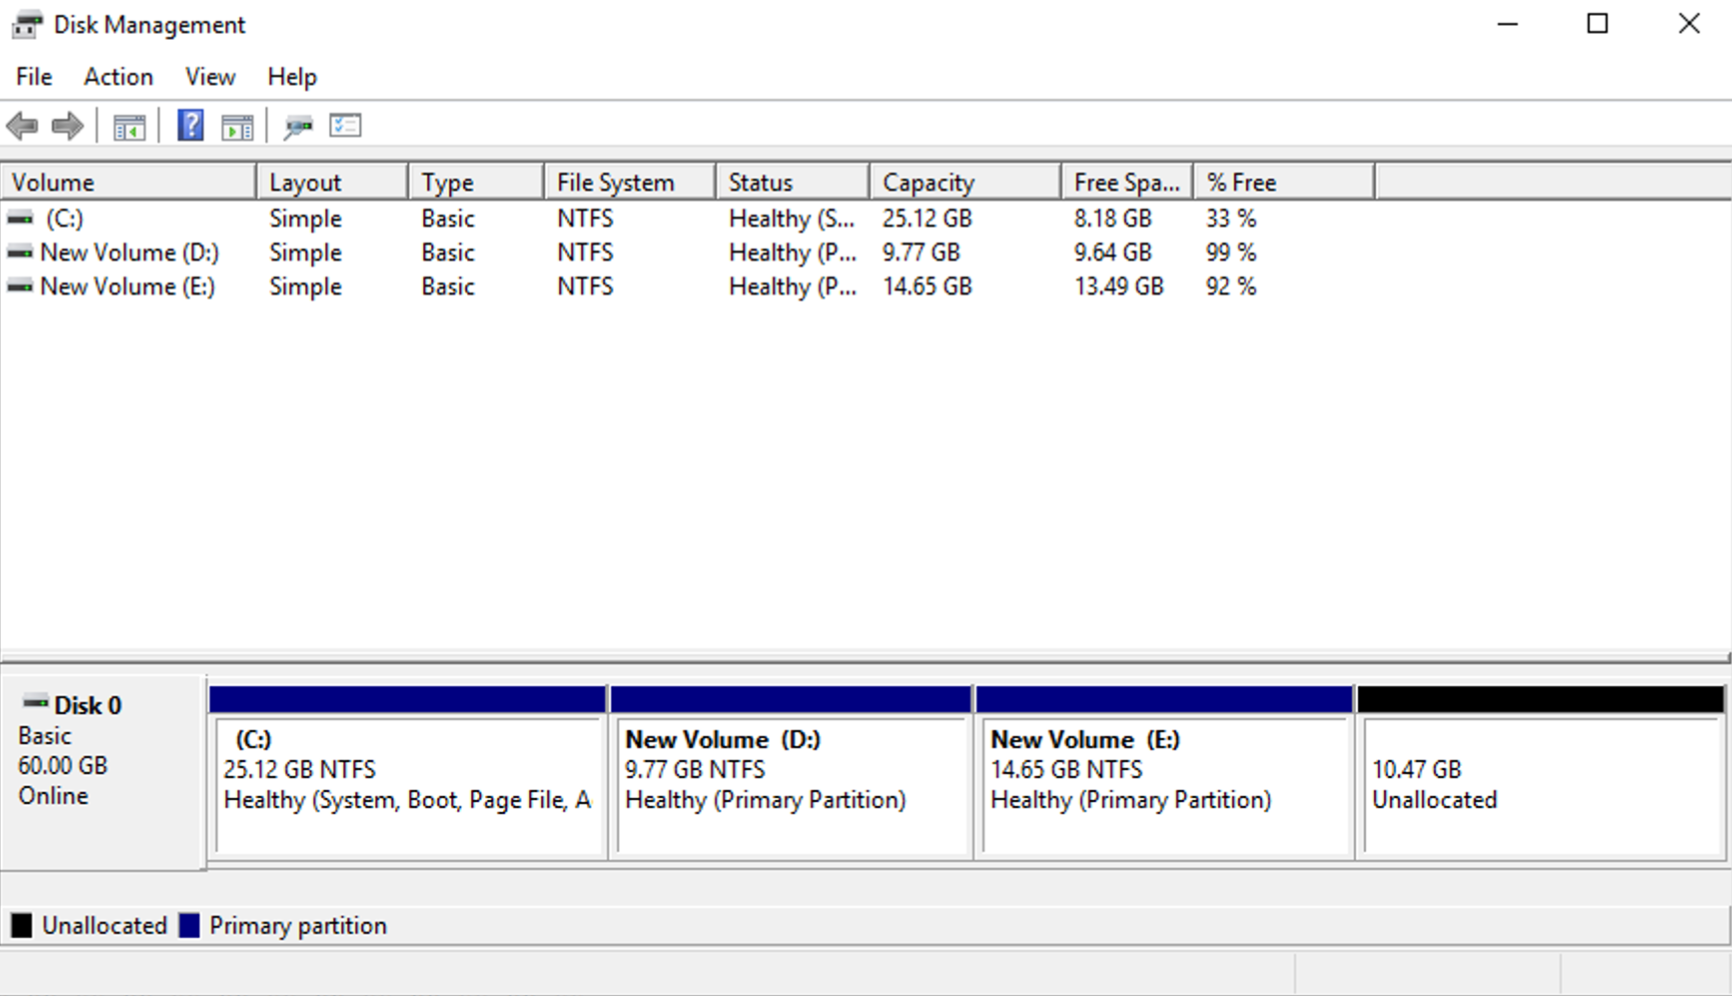
To help you understand this better, we’ve also included a screenshot from the Disk Management utility in Windows. This tool gives you a visual representation of the disk and its partitions. You’ll notice the same four partitions listed here that we saw earlier in the partition table.
By comparing these two views—the hex editor and the Disk Management utility—you can see how the partition details match up. This makes it easier to identify each partition and confirm that everything is in order—or spot anything unusual if something’s been tampered with.
Unlike the bootloader code, the hexadecimal digits in the partition table are full of useful information. Every byte (or group of bytes) represents something specific about the partition. This data can tell us things like where the partition starts, what type it is, and how big it is.
To make this easier to understand, let’s take the first partition from the partition table as an example. In the screenshot below, you’ll see this partition highlighted with different colors. Each color represents a different field. Some fields are just one byte, while others are made up of multiple bytes that work together to form a larger piece of information.

The table below shows the fields represented by these bytes.
| Bytes Position | Bytes Length | Bytes | Field Name |
|---|---|---|---|
| 0 | 1 | 80 | Boot Indicator |
| 1-3 | 3 | 20 21 00 | Starting CHS Address |
| 4 | 1 | 07 | Partition Type |
| 5-7 | 3 | FE FF FF | Ending CHS Address |
| 8-11 | 4 | 00 08 00 00 | Starting LBA Address |
| 12-15 | 4 | 00 B0 23 03 | Number of Sectors |
Each field in the partition table tells you something important about the partition. Let’s break it down field by field:
Boot Indicator
This byte tells you if the partition is bootable or not. It can only have two possible values:
80= Bootable (contains the operating system files).00= Not bootable.
In Windows-based systems, the C: drive is usually the bootable partition. If you check the partition table, the bootable partition will always have this indicator set to 80.
Starting CHS Address
The Cylinder Head Sector (CHS) address is a 3-byte field that tells you where the partition starts on the disk—right down to the cylinder, head, and sector number. Sounds fancy, right? But here’s the thing: CHS isn’t that useful anymore. Instead, we rely on the Starting LBA Address, which is a much easier way to locate the partition. More on that in a bit!
Partition Type
Every partition uses a specific filesystem (like NTFS, FAT32, etc.), and this byte tells you what type it is. For example, in our reference partition, this byte is 07, meaning it’s an NTFS partition. Each filesystem has a unique byte code.
Common partition values,
| Value | Description |
|---|---|
| 0x01 | FAT12 <32MB |
| 0x04 | FAT16 <32MB |
| 0x05 | MS Extended partition using CHS |
| 0x06 | FAT16B |
| 0x07 | NTFS, HPFS, exFAT |
| 0x0B | FAT32 CHS |
| 0x0C | FAT32 LBA |
| 0x0E | FAT16 LBA |
| 0x0F | MS Extended partition LBA |
| 0x42 | Windows Dynamic volume |
| 0x82 | Linux swap |
| 0x83 | Linux |
Ending CHS Address
This is similar to the Starting CHS Address, except it tells you where the partition ends on the disk. But again, like the starting CHS address, it’s not as useful because we prefer to use logical addresses (LBA).
Starting LBA Address
Now, this is where things get interesting! The Starting LBA (Logical Block Addressing) is a logical address that tells us exactly where the partition starts. It’s much easier to work with compared to CHS because it gives us a logical starting point.
In our reference partition, the Starting LBA Address is 00 08 00 00. We’ll use this logical address later to locate the partition in the hex editor. Bonus: You can even use this to carve data from hidden or deleted partitions!
Number of Sectors
These last 4 bytes tell you the total number of sectors in the partition. This field is super handy because it lets you calculate the size of the partition, which we’ll do shortly.
From what we’ve seen so far:
- The Boot Indicator and Partition Type are easy to read and don’t need further explanation.
- The Starting and Ending CHS Addresses are less important because we use LBA instead.
But—the Starting LBA Address and Number of Sectors? These are key fields that help us find and calculate the size of the partition. Let’s dive into how to use them!
Locating the Partition
Alright, now we’re getting into the fun part—locating the partition on the disk using the Starting LBA Address. In the partition we’re using as an example, the Starting LBA Address is 00 08 00 00. But wait! These bytes are stored in little-endian format, which means the Least Significant Byte (LSB) comes first, and the Most Significant Byte (MSB) comes last. So, we’ll need to reverse the order of these bytes.
After reversing, the bytes become 00 00 08 00. Much better!
Converting to Decimal
Now that we’ve got the correct order, we need to convert it into decimal format to get the actual starting block number. You can do this in two ways:
- Use an online hex-to-decimal converter.
- Use the HxD hex editor’s built-in Data Inspector.
If you’re using HxD, just select the bytes you want to convert, and check the Int32 option in the Data Inspector pane on the right. It will instantly show you the decimal value of the selected bytes.
Once you have that decimal value, you can use it to locate the exact sector in the hex editor and start analyzing the partition’s contents!
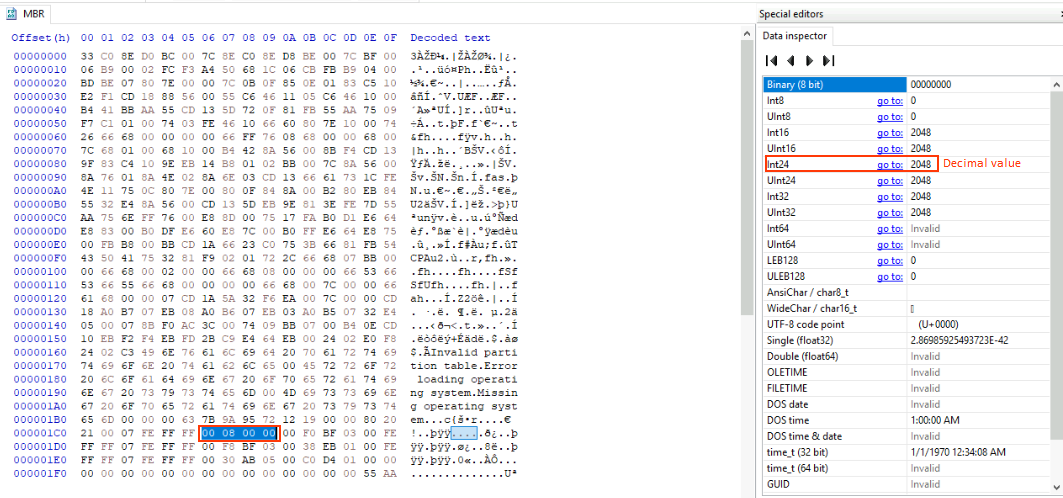
Now that we’ve converted the Starting LBA Address to a decimal value, we have 2048. The next step is to figure out the exact location of the partition by multiplying it by the sector size, which is 512 bytes.
Here’s the math:
2048 x 512 = 1,048,576
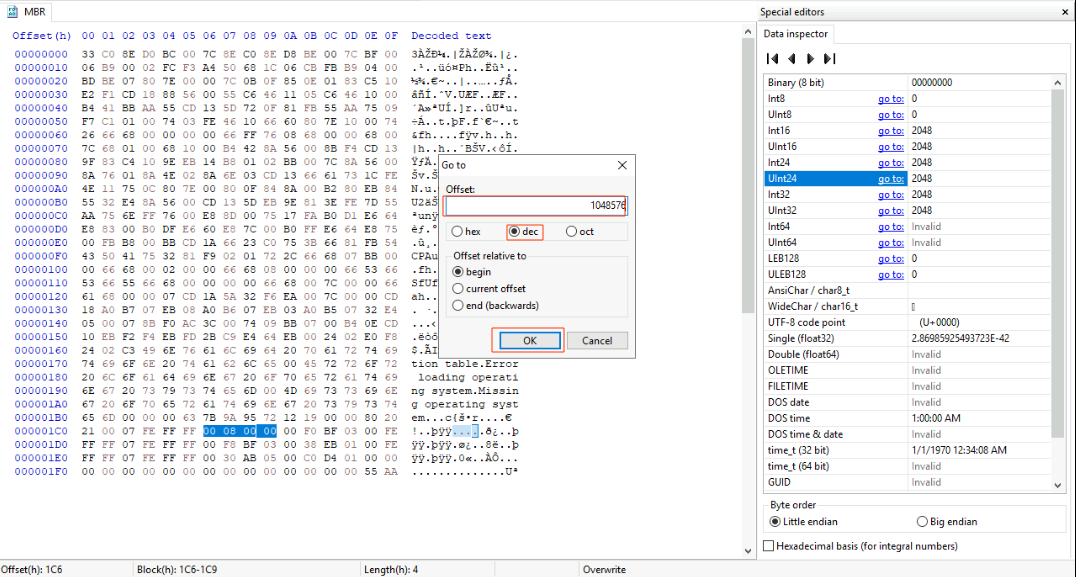
This means the partition starts at byte 1,048,576 on the disk. The last step is to search for this value in the HxD tool to jump to the start of this partition. To search this value, first click the Search button and then click the Go to option.
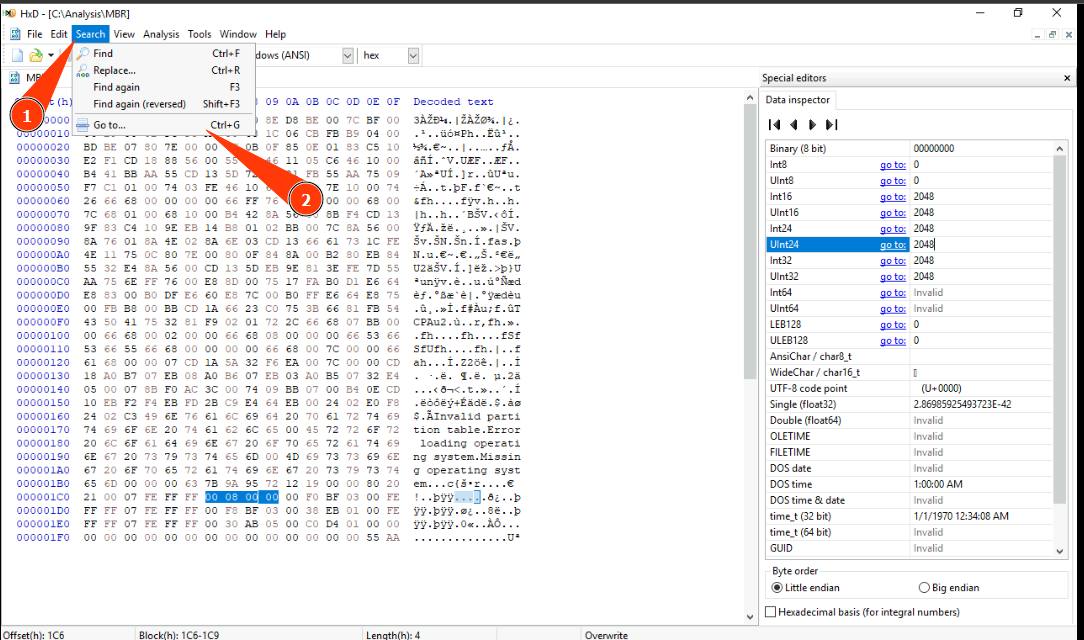
Now, input the value in the prompt, select the decimal format (dec) and click the OK button.
Once you’ve jumped to the starting LBA in the hex editor, you’ll land right at the start of the partition on the disk. This is where the real fun begins! You can now carry out detailed forensic analysis of this specific partition.
This technique is especially useful for recovering hidden or deleted data that hasn’t been overwritten yet. You can carve out the data and potentially recover lost files or investigate suspicious activity.
Calculating the Size of Partition
The last four bytes in the partition table represent the Number of Sectors field.
For our example first partition, these bytes are 00 B0 23 03. Since they’re stored in little-endian format, we need to reverse them first, just like we did earlier. After reversing, they become 03 23 B0 00.
Now, let’s convert 03 23 B0 00 to decimal. You can do this in the HxD tool by highlighting the bytes and checking the Int32 value in the Data Inspector pane—just like we did for the Starting LBA Address. The decimal value for these bytes comes out to be 52,670,464.
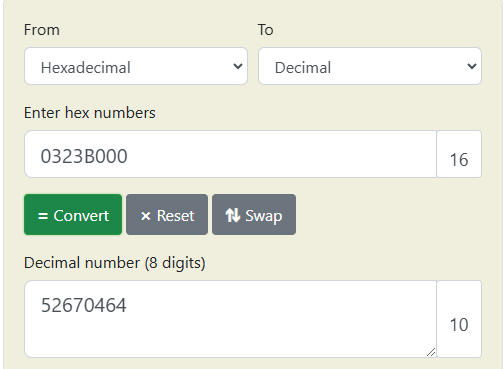
Each sector is 512 bytes, so to get the size of the partition, we just multiply the Number of Sectors by the sector size:
52,670,464 x 512 = 26,967,277,568 bytes
That’s it! This means the size of this partition is 26.97 GB. Knowing the size is crucial for analyzing the data in that partition or determining if it matches the expected size during a forensic investigation.
MBR Signature (Bytes 510-511)
The last part of the Master Boot Record (MBR) is the MBR Signature. It’s just two bytes—short and simple, right? But don’t underestimate its importance! If these two bytes are altered or missing, it can cause major trouble and prevent the system from booting altogether. In the screenshot below, you’ll see the whole MBR with the MBR signature highlighted at the very bottom.
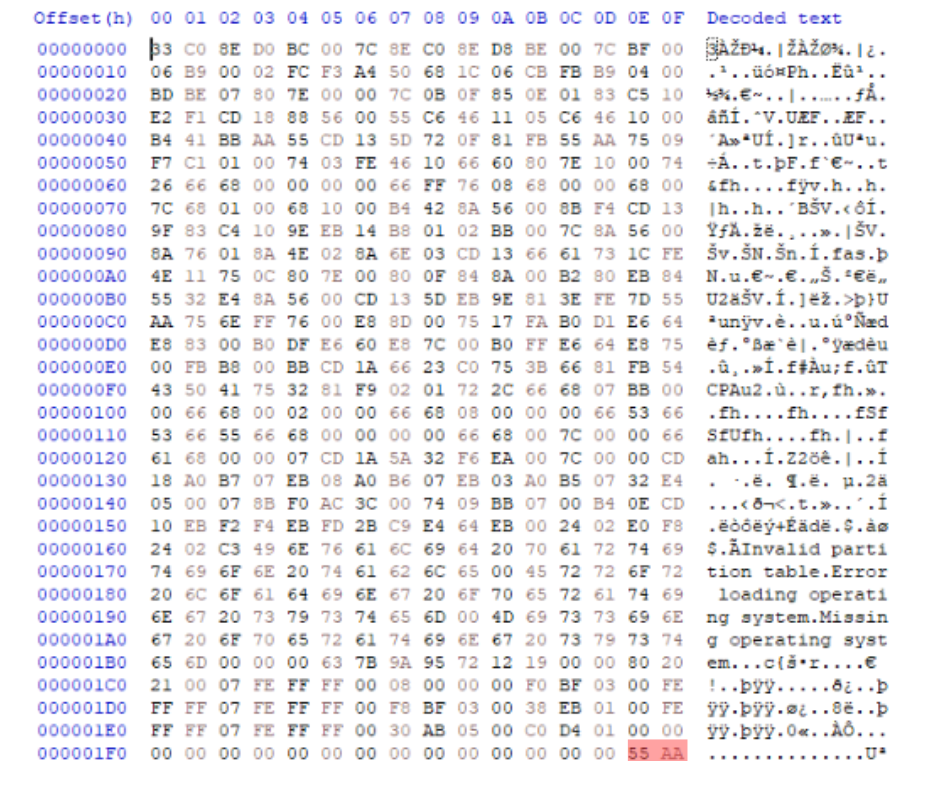
In every valid MBR, the signature is always 55 AA, and it appears right at the end. This signature acts like a “seal of authenticity,” letting the system know that the MBR is complete and ready for action.
Conclusion
Analyzing the Master Boot Record (MBR) is a fundamental skill in digital forensics. Each part of the MBR—the bootloader code, partition table, and MBR signature—plays a crucial role in the boot process and can reveal valuable information during an investigation.
In forensics, every byte tells a story—you just have to know how to read it!